Tragedy at The Nek, Gallipoli
One of the most poignant site visits during a battlefield tour of Gallipoli is that to The Nek. Gallipoli is all about the ground and, while many of the other well-known places evoke emotions, none of them has the same effect on the viewer as does The Nek. You cannot stand on that ground and not be moved by the futile sacrifice of the 3rd Australian Light Horse Brigade (3 ALH Bde) on 7 August 1915.
3 ALH Bde was raised in October 1914, in the initial expansion of the force offered to Great Britain at the outbreak of war. It comprised the 8th Regiment (Victoria),  the 9th Regiment (two squadrons from South Australia and one from Victoria) and the 10th Regiment (Western Australia). Departing Australia during February 1915, the brigade was concentrated at Mena Camp, Egypt, a few weeks before the 1st Australian Division left for Gallipoli.
The failure to develop operations out of the Gallipoli beachhead left the ANZAC infantry pinned to a narrow coastal strip. It was clear that any advance would require an immediate and sizeable reinforcement and the nearest available was the force of Australian and New Zealand mounted troops languishing in Egypt. It was decided to send this force to Gallipoli, dismounted, to fight as infantry. The only compensation for giving up their horses was that the units would deploy and fight as entities, rather than be broken up and sent as individual reinforcements. The decision was generally welcomed by the light horsemen, eager to get into the fight.
By 21 May, the brigade was landing at the ANZAC beachhead. Initially the brigade was spread among the northern positions of the front line, to gain experience under the supervision of the 1st Australian Light Horse Brigade and the New Zealand Mounted Rifles Brigade. In June 3 ALH Bde relieved the New Zealanders, taking over responsibility for Russell’s Top. They were now directly facing the Turks at The Nek. The Nek is a narrow saddle, connecting Russell’s Top to the Baby 700 feature, formed by the heads of Monash Valley and Malone’s Gully cutting deeply into the Top from north and south. At the time of the attack the ground here had little vegetation, providing the Turks with clear lines of observation and fire.
The light horsemen settled into the defensive routine, continually working to improve the position. This was interrupted by a major Turkish assault on the night of 30 June. In what should have served as proof of the impossibility of successfully attacking across The Nek against prepared defences, the forewarned light horsemen extracted a very high price at little cost to themselves.
The August Offensive, planned to achieve a break-out from the ANZAC perimeter and restore manoeuvre to the stalled campaign, included a major task for 3 ALH Bde. Following the feint at Lone Pine at 5.30 pm on 6 August, at midnight the 6th Battalion were to attack and destroy the Turkish machine gun emplacement at German Officer’s Trench which covered the approach to Baby 700 from The Nek. Then, at 4.30 am on 7 August, attacks were to be launched against the Turkish positions at the Chessboard and opposite Quinn’s Post, which also covered the ground between Baby 700 and The Nek. At the same time, the New Zealanders, who by this time were to have captured Chunuk Bair by a flanking movement, were to change direction and attack down the Sari Bair ridgeline onto the rear of the Turkish positions on Baby 700, while 3 ALH Bde were to attack across The Nek onto the heavily defended western face of Baby 700.
the 9th Regiment (two squadrons from South Australia and one from Victoria) and the 10th Regiment (Western Australia). Departing Australia during February 1915, the brigade was concentrated at Mena Camp, Egypt, a few weeks before the 1st Australian Division left for Gallipoli.
The failure to develop operations out of the Gallipoli beachhead left the ANZAC infantry pinned to a narrow coastal strip. It was clear that any advance would require an immediate and sizeable reinforcement and the nearest available was the force of Australian and New Zealand mounted troops languishing in Egypt. It was decided to send this force to Gallipoli, dismounted, to fight as infantry. The only compensation for giving up their horses was that the units would deploy and fight as entities, rather than be broken up and sent as individual reinforcements. The decision was generally welcomed by the light horsemen, eager to get into the fight.
By 21 May, the brigade was landing at the ANZAC beachhead. Initially the brigade was spread among the northern positions of the front line, to gain experience under the supervision of the 1st Australian Light Horse Brigade and the New Zealand Mounted Rifles Brigade. In June 3 ALH Bde relieved the New Zealanders, taking over responsibility for Russell’s Top. They were now directly facing the Turks at The Nek. The Nek is a narrow saddle, connecting Russell’s Top to the Baby 700 feature, formed by the heads of Monash Valley and Malone’s Gully cutting deeply into the Top from north and south. At the time of the attack the ground here had little vegetation, providing the Turks with clear lines of observation and fire.
The light horsemen settled into the defensive routine, continually working to improve the position. This was interrupted by a major Turkish assault on the night of 30 June. In what should have served as proof of the impossibility of successfully attacking across The Nek against prepared defences, the forewarned light horsemen extracted a very high price at little cost to themselves.
The August Offensive, planned to achieve a break-out from the ANZAC perimeter and restore manoeuvre to the stalled campaign, included a major task for 3 ALH Bde. Following the feint at Lone Pine at 5.30 pm on 6 August, at midnight the 6th Battalion were to attack and destroy the Turkish machine gun emplacement at German Officer’s Trench which covered the approach to Baby 700 from The Nek. Then, at 4.30 am on 7 August, attacks were to be launched against the Turkish positions at the Chessboard and opposite Quinn’s Post, which also covered the ground between Baby 700 and The Nek. At the same time, the New Zealanders, who by this time were to have captured Chunuk Bair by a flanking movement, were to change direction and attack down the Sari Bair ridgeline onto the rear of the Turkish positions on Baby 700, while 3 ALH Bde were to attack across The Nek onto the heavily defended western face of Baby 700.
 Because only one, narrow approach was available, the 3 ALH Bde plan was for a frontal attack by four waves each of 150 men. The attack would go in as soon as the supporting artillery bombardment ceased at 4.30 am. The brigade would attack with two regiments – the 8th providing the first and second waves, while the third and fourth waves would come from the 10th Regiment.
At 4.00 am the artillery fire increased and concentrated on The Nek and Baby 700, as planned. Then, inexplicably, at 4.23 am the bombardment suddenly ceased. Not knowing if it was an attempt to catch the Turks by surprise with a sudden resumption of fire, Lieutenant Colonel White, leading the first wave, held his men in check until the appointed time. In the intervening seven minutes the waiting light horsemen could hear the Turks reoccupying their trenches.
Because only one, narrow approach was available, the 3 ALH Bde plan was for a frontal attack by four waves each of 150 men. The attack would go in as soon as the supporting artillery bombardment ceased at 4.30 am. The brigade would attack with two regiments – the 8th providing the first and second waves, while the third and fourth waves would come from the 10th Regiment.
At 4.00 am the artillery fire increased and concentrated on The Nek and Baby 700, as planned. Then, inexplicably, at 4.23 am the bombardment suddenly ceased. Not knowing if it was an attempt to catch the Turks by surprise with a sudden resumption of fire, Lieutenant Colonel White, leading the first wave, held his men in check until the appointed time. In the intervening seven minutes the waiting light horsemen could hear the Turks reoccupying their trenches.
 By 4.30 am the fate of 3 ALH Bde was sealed. The earlier attack on German Officer’s Trench, and the supporting attacks against the Chessboard, had failed with heavy casualties, so the Turkish supporting fire from flanking positions was intact. The New Zealanders had not reached the top of Chunuk Bair, so there would be no converging attack onto the rear of Baby 700, leaving the Turks there free to concentrate their fire on The Nek.
When his watch indicated 4.30 am, White led the first wave out. With the distance between the opposing lines only some 40 metres, the Turkish fire was immediate and devastating. With the first wave shattered just metres from their start line, the second wave went over at 4.32 am, only to suffer the same fate. Lieutenant Colonel Noel Brazier, commanding the 10th Regiment, had watched the destruction of the first two waves. Before ordering his men of the third wave to attack he sought a decision from brigade headquarters. Colonel Hughes, the brigade commander, had gone forward to observe and Brazier confronted the brigade major, Lieutenant Colonel Antill.
An ongoing antagonism had existed between the two men, beginning during the brigade’s training in Australia and continuing through the time in Egypt. Antill had no sympathy for Brazier’s views and ordered the third and fourth waves to proceed. The third wave went over on command and was also cut down. Brazier, again failing to get Antill to cancel the attack, found the brigade commander who decided to have the fourth wave attempt a flanking move through Monash Valley. Tragically, before Brazier could relay this new order, part of the fourth wave also moved out towards The Nek, falling with their mates already there.
By 4.30 am the fate of 3 ALH Bde was sealed. The earlier attack on German Officer’s Trench, and the supporting attacks against the Chessboard, had failed with heavy casualties, so the Turkish supporting fire from flanking positions was intact. The New Zealanders had not reached the top of Chunuk Bair, so there would be no converging attack onto the rear of Baby 700, leaving the Turks there free to concentrate their fire on The Nek.
When his watch indicated 4.30 am, White led the first wave out. With the distance between the opposing lines only some 40 metres, the Turkish fire was immediate and devastating. With the first wave shattered just metres from their start line, the second wave went over at 4.32 am, only to suffer the same fate. Lieutenant Colonel Noel Brazier, commanding the 10th Regiment, had watched the destruction of the first two waves. Before ordering his men of the third wave to attack he sought a decision from brigade headquarters. Colonel Hughes, the brigade commander, had gone forward to observe and Brazier confronted the brigade major, Lieutenant Colonel Antill.
An ongoing antagonism had existed between the two men, beginning during the brigade’s training in Australia and continuing through the time in Egypt. Antill had no sympathy for Brazier’s views and ordered the third and fourth waves to proceed. The third wave went over on command and was also cut down. Brazier, again failing to get Antill to cancel the attack, found the brigade commander who decided to have the fourth wave attempt a flanking move through Monash Valley. Tragically, before Brazier could relay this new order, part of the fourth wave also moved out towards The Nek, falling with their mates already there.
 The attack at The Nek had failed and 372 light horsemen were dead or wounded. The plan may have been too complex relying heavily, as it did, on the success of preliminary and supporting operations. The senior command of 3 ALH Bde may have been ineffective, and an unforgivable error occurred in not synchronising time between fire support and the attacking troops. However, you can only admire the courage, determination and devotion to duty of the troopers of the 3rd Light Horse Brigade.
Boronia Battlefield Tours offers an in-depth consideration of the events on the ground at The Nek with the August Offensive Tour, 1-14 August 2015. This is an opportunity to commemorate this and other battles of the August Offensive, during the Centenary year.
Article written by Rod Margetts - who is a battlefield tour guide for Boronia Travel Centre.
Image Top Left: The charge of the 3rd Light Horse Brigade at the Nek, 7 August 1915 by George Lambert, 1924.
Image Middle Right: Gallipoli, Turkey. 8th Australian Light Horse Regiment preparing to leave the area known as Rest Camp B.
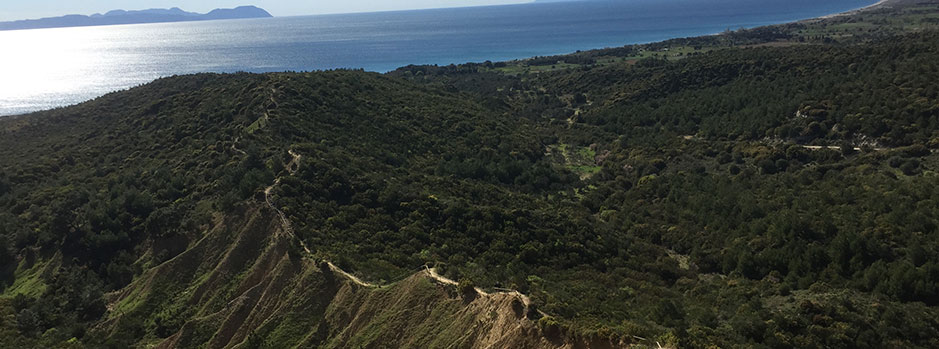
Image Bottom Left: A reconstructed trench built by the Anzacs at the location known as the Nek, where hundreds of Anzacs were slaughtered in one episode. Photo courtesy Coffs Coast Advocate.
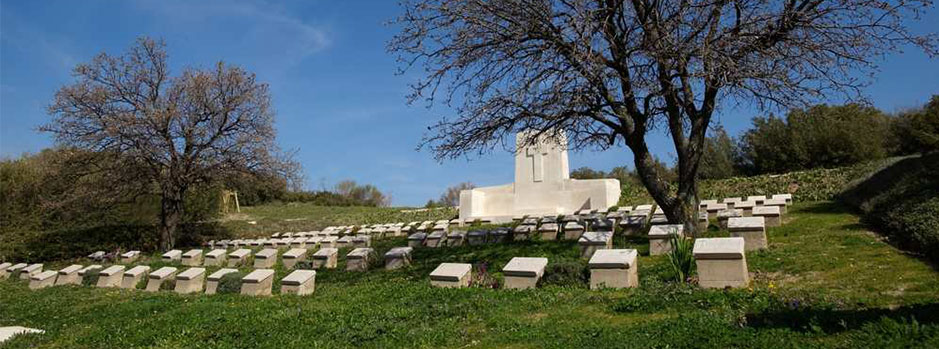
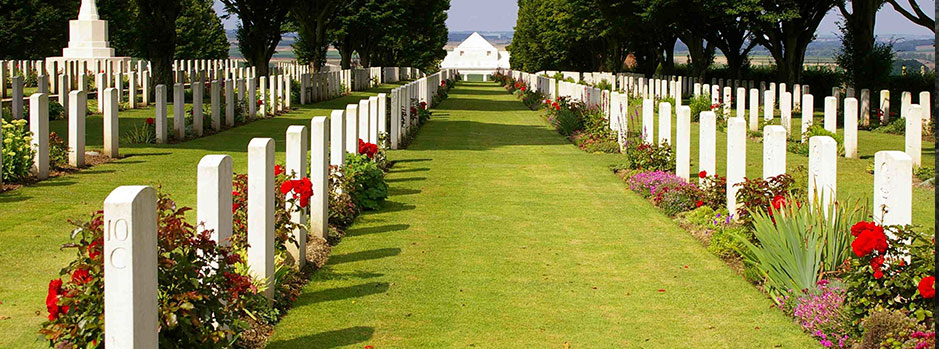
Image Bottom Right: The Nek Cemetery above Anzac Cove on the Gallipoli Peninsula, built on what was no-man's land between the original front lines. Digital photo taken on 23 May 2006.
The attack at The Nek had failed and 372 light horsemen were dead or wounded. The plan may have been too complex relying heavily, as it did, on the success of preliminary and supporting operations. The senior command of 3 ALH Bde may have been ineffective, and an unforgivable error occurred in not synchronising time between fire support and the attacking troops. However, you can only admire the courage, determination and devotion to duty of the troopers of the 3rd Light Horse Brigade.
Boronia Battlefield Tours offers an in-depth consideration of the events on the ground at The Nek with the August Offensive Tour, 1-14 August 2015. This is an opportunity to commemorate this and other battles of the August Offensive, during the Centenary year.
Article written by Rod Margetts - who is a battlefield tour guide for Boronia Travel Centre.
Image Top Left: The charge of the 3rd Light Horse Brigade at the Nek, 7 August 1915 by George Lambert, 1924.
Image Middle Right: Gallipoli, Turkey. 8th Australian Light Horse Regiment preparing to leave the area known as Rest Camp B.
Image Bottom Left: A reconstructed trench built by the Anzacs at the location known as the Nek, where hundreds of Anzacs were slaughtered in one episode. Photo courtesy Coffs Coast Advocate.
Image Bottom Right: The Nek Cemetery above Anzac Cove on the Gallipoli Peninsula, built on what was no-man's land between the original front lines. Digital photo taken on 23 May 2006.
the 9th Regiment (two squadrons from South Australia and one from Victoria) and the 10th Regiment (Western Australia). Departing Australia during February 1915, the brigade was concentrated at Mena Camp, Egypt, a few weeks before the 1st Australian Division left for Gallipoli.
The failure to develop operations out of the Gallipoli beachhead left the ANZAC infantry pinned to a narrow coastal strip. It was clear that any advance would require an immediate and sizeable reinforcement and the nearest available was the force of Australian and New Zealand mounted troops languishing in Egypt. It was decided to send this force to Gallipoli, dismounted, to fight as infantry. The only compensation for giving up their horses was that the units would deploy and fight as entities, rather than be broken up and sent as individual reinforcements. The decision was generally welcomed by the light horsemen, eager to get into the fight.
By 21 May, the brigade was landing at the ANZAC beachhead. Initially the brigade was spread among the northern positions of the front line, to gain experience under the supervision of the 1st Australian Light Horse Brigade and the New Zealand Mounted Rifles Brigade. In June 3 ALH Bde relieved the New Zealanders, taking over responsibility for Russell’s Top. They were now directly facing the Turks at The Nek. The Nek is a narrow saddle, connecting Russell’s Top to the Baby 700 feature, formed by the heads of Monash Valley and Malone’s Gully cutting deeply into the Top from north and south. At the time of the attack the ground here had little vegetation, providing the Turks with clear lines of observation and fire.
The light horsemen settled into the defensive routine, continually working to improve the position. This was interrupted by a major Turkish assault on the night of 30 June. In what should have served as proof of the impossibility of successfully attacking across The Nek against prepared defences, the forewarned light horsemen extracted a very high price at little cost to themselves.
The August Offensive, planned to achieve a break-out from the ANZAC perimeter and restore manoeuvre to the stalled campaign, included a major task for 3 ALH Bde. Following the feint at Lone Pine at 5.30 pm on 6 August, at midnight the 6th Battalion were to attack and destroy the Turkish machine gun emplacement at German Officer’s Trench which covered the approach to Baby 700 from The Nek. Then, at 4.30 am on 7 August, attacks were to be launched against the Turkish positions at the Chessboard and opposite Quinn’s Post, which also covered the ground between Baby 700 and The Nek. At the same time, the New Zealanders, who by this time were to have captured Chunuk Bair by a flanking movement, were to change direction and attack down the Sari Bair ridgeline onto the rear of the Turkish positions on Baby 700, while 3 ALH Bde were to attack across The Nek onto the heavily defended western face of Baby 700.
Because only one, narrow approach was available, the 3 ALH Bde plan was for a frontal attack by four waves each of 150 men. The attack would go in as soon as the supporting artillery bombardment ceased at 4.30 am. The brigade would attack with two regiments – the 8th providing the first and second waves, while the third and fourth waves would come from the 10th Regiment.
At 4.00 am the artillery fire increased and concentrated on The Nek and Baby 700, as planned. Then, inexplicably, at 4.23 am the bombardment suddenly ceased. Not knowing if it was an attempt to catch the Turks by surprise with a sudden resumption of fire, Lieutenant Colonel White, leading the first wave, held his men in check until the appointed time. In the intervening seven minutes the waiting light horsemen could hear the Turks reoccupying their trenches.
By 4.30 am the fate of 3 ALH Bde was sealed. The earlier attack on German Officer’s Trench, and the supporting attacks against the Chessboard, had failed with heavy casualties, so the Turkish supporting fire from flanking positions was intact. The New Zealanders had not reached the top of Chunuk Bair, so there would be no converging attack onto the rear of Baby 700, leaving the Turks there free to concentrate their fire on The Nek.
When his watch indicated 4.30 am, White led the first wave out. With the distance between the opposing lines only some 40 metres, the Turkish fire was immediate and devastating. With the first wave shattered just metres from their start line, the second wave went over at 4.32 am, only to suffer the same fate. Lieutenant Colonel Noel Brazier, commanding the 10th Regiment, had watched the destruction of the first two waves. Before ordering his men of the third wave to attack he sought a decision from brigade headquarters. Colonel Hughes, the brigade commander, had gone forward to observe and Brazier confronted the brigade major, Lieutenant Colonel Antill.
An ongoing antagonism had existed between the two men, beginning during the brigade’s training in Australia and continuing through the time in Egypt. Antill had no sympathy for Brazier’s views and ordered the third and fourth waves to proceed. The third wave went over on command and was also cut down. Brazier, again failing to get Antill to cancel the attack, found the brigade commander who decided to have the fourth wave attempt a flanking move through Monash Valley. Tragically, before Brazier could relay this new order, part of the fourth wave also moved out towards The Nek, falling with their mates already there.
The attack at The Nek had failed and 372 light horsemen were dead or wounded. The plan may have been too complex relying heavily, as it did, on the success of preliminary and supporting operations. The senior command of 3 ALH Bde may have been ineffective, and an unforgivable error occurred in not synchronising time between fire support and the attacking troops. However, you can only admire the courage, determination and devotion to duty of the troopers of the 3rd Light Horse Brigade.
Boronia Battlefield Tours offers an in-depth consideration of the events on the ground at The Nek with the August Offensive Tour, 1-14 August 2015. This is an opportunity to commemorate this and other battles of the August Offensive, during the Centenary year.
Article written by Rod Margetts - who is a battlefield tour guide for Boronia Travel Centre.
Image Top Left: The charge of the 3rd Light Horse Brigade at the Nek, 7 August 1915 by George Lambert, 1924.
Image Middle Right: Gallipoli, Turkey. 8th Australian Light Horse Regiment preparing to leave the area known as Rest Camp B.
Image Bottom Left: A reconstructed trench built by the Anzacs at the location known as the Nek, where hundreds of Anzacs were slaughtered in one episode. Photo courtesy Coffs Coast Advocate.
Image Bottom Right: The Nek Cemetery above Anzac Cove on the Gallipoli Peninsula, built on what was no-man's land between the original front lines. Digital photo taken on 23 May 2006.
This entry was posted in Historical Highlights. Bookmark the permalink.