The Capture of German New Guinea – 1914
Last September, when discussing the loss of the AE1, we mentioned the expedition to capture the German New Guinea territory in 1914. We return now to look at this, the first Australian force deployment of World War 1, in more detail.
Despite a late start, Germany was determined to match Britain and France in the race to acquire overseas possessions. Her colonising efforts in the Pacific included occupation of the north coast of New Guinea and adjacent islands in 1884. A naval base for the German East Asiatic Squadron was established in China in 1897 and in 1899 the Caroline, Marshall and Mariana Islands were purchased from Spain. The German strategic position in the South Pacific was further strengthened with control of Samoa in 1900. These territories provided coaling and wireless communication stations throughout the region and allowed Germany to threaten both Australia and New Zealand. With the approach of war, it was obvious that action would be required against that threat.
On the outbreak of war, and with the German East Asiatic Squadron cruising in the Pacific, the call to arms came. On 6 August 1914 the British government asked for action against German installations in the Marshalls, at Nauru and on the north coast of New Guinea. Australia was already heavily involved in raising the 20,000 men offered to Britain for the war and now this additional force had to be found. It was decided that it would comprise 500 naval reservists and 1000 infantry, together with limited supporting arms and services, and would be titled the Australian Naval and Military Expeditionary Force (ANMEF). Enlistment began on 11 August, with far more men than were required offering their services to the first Australian force to be sent overseas in the war. As would be the case with the AIF, every trade and vocation was represented in the composition of the ANMEF, providing all of the skills required later for the administration of the captured territory.
At midday on 19 August the force sailed from Sydney in the troopship Berrima, moving first to Brisbane, then to Palm Island on the 24th. At this time the navy was busy escorting a New Zealand contingent tasked to capture Samoa, so the ANMEF was held at Palm Island awaiting the return of the Australian warships. The delay was utilised for some much-needed training for the hastily recruited force, particularly in rifle shooting. The force was ordered to rendezvous with the rest of the fleet at the Louisiade Islands, off the eastern tip of New Guinea, on the morning of 9 September. Meanwhile HMAS Melbourne had been detached from the returning squadron to destroy the German wireless station on Nauru.
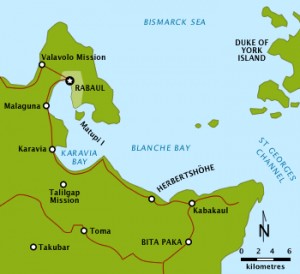 Final planning was completed at the rendezvous. The force was expecting first to deal with the German installations on New Britain - two wireless stations, at Herbertshӧhe and Bitapaka, as well as the administrative centre of Rabaul. Subsequent operations would be needed to secure the other German centres on the north coast of New Guinea. Early on 11 September the fleet was off Blanche Bay, New Britain. Destroyers searched the various harbours and inlets for German vessels, finding none; the main pier at Rabaul was clear and there was no trace of mines in Simpson Harbour.
Naval landing parties were put ashore at Herbertshӧhe and Kabakaul to secure the wireless stations. It was later established that both wireless stations were at Bitapaka, so the search at Herbertshӧhe proved fruitless; the Bitapaka front, however, provided plenty of action. The party landed at Kabakaul, under the command of Lieutenant Bowen, RAN, moved inland along the Bitapaka road. The Germans had prepared a series of positions covering this approach, manned by native troops, and had improvised mines buried under the road surface. The first position was outflanked by a small scouting group, the German commander being wounded and forced to surrender. He was then sent ahead of the Australians to announce that a large force had landed and that the remaining defenders should surrender. Believing that they were outnumbered, the intermediate defence lines withdrew, leaving only the troops at Bitapaka itself to resist the Australians.
The advance continued, clearing several trenches but also taking casualties. The Australians continued the tactic of outflanking the fixed defences, which had been sited to cover the road, and this unsettled the native defenders. After further reinforcements arrived, a final push secured the surrender of the German forces and capture of the wireless station by 7.00 pm.
 Herbertshӧhe and Rabaul were occupied next day and the surrender of the remaining German forces on New Britain followed. Within weeks the German centres on Bougainville, at Madang on the north coast of New Guinea, and in the Admiralty Islands were occupied without opposition. The military administration thus established remained in force until Australia was granted a League of Nations mandate to administer the Territory of New Guinea in 1921.
Australia’s first operational deployment of the war had been a success, although it is largely unknown today. The German presence in the South Pacific had been neutralised and the logistical and communications support for future naval operations destroyed. The human cost of the operation was six dead and four wounded, to which must be added the 35 men of the AE1, which disappeared without trace off New Britain on 14 September.
Article written by Rod Margetts - who is a battlefield tour guide for Boronia Travel Centre.
Image Top Left: Embarkation of the Australian Naval and Military Expeditionary Force (AN&MEF) for New Guinea. At the request of the British Government a special force, the Australian Navy and Military Expeditionary Force, was raised between 10 August 1914 and 18 August 1914, and despatched against the neighbouring German colonies. These were the first infantry to leave Australia. Source: AWM
Image Middle Right: Simple map of the Rabaul area, showing Herbertshὂhe, Kabakaul and Bitapaka. Source: Wikipedia.com
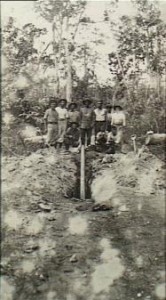
Image Bottom Left: Group portrait of RAN members of the Australian Naval and Military Expeditionary Force (AN&MEF) standing behind a pipe mine which they have been digging out on Bitapaka Road after the taking of the German wireless station on 11 September 1914. These mines were laid by German soldiers beneath the road with wires leading to an electric battery and firing key at the bottom of a lookout tree. Note the dense jungle in the background which the naval men were required to force their way through in order to capture the wireless station. Source: AWM Public Domain.
 Final planning was completed at the rendezvous. The force was expecting first to deal with the German installations on New Britain - two wireless stations, at Herbertshӧhe and Bitapaka, as well as the administrative centre of Rabaul. Subsequent operations would be needed to secure the other German centres on the north coast of New Guinea. Early on 11 September the fleet was off Blanche Bay, New Britain. Destroyers searched the various harbours and inlets for German vessels, finding none; the main pier at Rabaul was clear and there was no trace of mines in Simpson Harbour.
Naval landing parties were put ashore at Herbertshӧhe and Kabakaul to secure the wireless stations. It was later established that both wireless stations were at Bitapaka, so the search at Herbertshӧhe proved fruitless; the Bitapaka front, however, provided plenty of action. The party landed at Kabakaul, under the command of Lieutenant Bowen, RAN, moved inland along the Bitapaka road. The Germans had prepared a series of positions covering this approach, manned by native troops, and had improvised mines buried under the road surface. The first position was outflanked by a small scouting group, the German commander being wounded and forced to surrender. He was then sent ahead of the Australians to announce that a large force had landed and that the remaining defenders should surrender. Believing that they were outnumbered, the intermediate defence lines withdrew, leaving only the troops at Bitapaka itself to resist the Australians.
The advance continued, clearing several trenches but also taking casualties. The Australians continued the tactic of outflanking the fixed defences, which had been sited to cover the road, and this unsettled the native defenders. After further reinforcements arrived, a final push secured the surrender of the German forces and capture of the wireless station by 7.00 pm.
 Herbertshӧhe and Rabaul were occupied next day and the surrender of the remaining German forces on New Britain followed. Within weeks the German centres on Bougainville, at Madang on the north coast of New Guinea, and in the Admiralty Islands were occupied without opposition. The military administration thus established remained in force until Australia was granted a League of Nations mandate to administer the Territory of New Guinea in 1921.
Australia’s first operational deployment of the war had been a success, although it is largely unknown today. The German presence in the South Pacific had been neutralised and the logistical and communications support for future naval operations destroyed. The human cost of the operation was six dead and four wounded, to which must be added the 35 men of the AE1, which disappeared without trace off New Britain on 14 September.
Article written by Rod Margetts - who is a battlefield tour guide for Boronia Travel Centre.
Image Top Left: Embarkation of the Australian Naval and Military Expeditionary Force (AN&MEF) for New Guinea. At the request of the British Government a special force, the Australian Navy and Military Expeditionary Force, was raised between 10 August 1914 and 18 August 1914, and despatched against the neighbouring German colonies. These were the first infantry to leave Australia. Source: AWM
Image Middle Right: Simple map of the Rabaul area, showing Herbertshὂhe, Kabakaul and Bitapaka. Source: Wikipedia.com
Image Bottom Left: Group portrait of RAN members of the Australian Naval and Military Expeditionary Force (AN&MEF) standing behind a pipe mine which they have been digging out on Bitapaka Road after the taking of the German wireless station on 11 September 1914. These mines were laid by German soldiers beneath the road with wires leading to an electric battery and firing key at the bottom of a lookout tree. Note the dense jungle in the background which the naval men were required to force their way through in order to capture the wireless station. Source: AWM Public Domain.
This entry was posted in Historical Highlights. Bookmark the permalink.
