Gallipoli – From Defeat at Sea to Defeat on Land
In the previous two monthly historical highlights we have traced the naval attempt to take Turkey out of the war and reopen the sea-route to Russia. We now turn to the land campaign, the outcome of which also failed to meet expectations.
By March 1915 the Dardanelles campaign was undergoing serious reconsideration. The Mediterranean Expeditionary Force (MEF) was formed, comprised of Lieutenant General Birdwood’s Australian and New Zealand Army Corps (ANZAC) and the Royal Naval Division (RND). Secretary of State for War, Lord Kitchener, was finally convinced to release the British 29th Division, the only remaining pre-war regular division, for the force. The French government would also contribute a division to the campaign. Following the failure of the main naval effort on 18 March, planning moved to a land-based campaign with the Navy in a supporting role. The MEF would carry out assault landings on seven different beaches on 25 April, as well as two supporting deception operations. At issue was whether it was now too late to achieve victory with a major change of direction in the strategy.
We now turn to the ANZAC part in this great story. The Corps, comprised of the 1st Australian Division and the New Zealand and Australian (NZ&A) Division, was to land on “Z” Beach, the northern end of the beach stretching from Gaba Tepe to the area of Anzac Cove, beginning before first light. Their role was to secure the flank of the main British landings at Cape Helles by preventing Turkish reserves moving south. The 1st Division would land first, by brigades, with the 3rd Brigade leading as a covering force to secure the beachhead line. This was to be done with three battalions, the 9th, 10th and 11th forward along the high ground of Third or “Gun” Ridge, with the 12th Battalion in reserve. In addition the 9th Battalion, as the southernmost in the line, was to detach a company to capture the Turkish position at Gaba Tepe. The landing frontage was to be 1500 metres to enable a wide and rapid advance to secure the beachhead line. The 2nd Brigade was to land next and move to secure the high ground of the Sari Bair Range (Baby 700, Battleship Hill, Chunuk Bair to Hill 971) on the northern end of the beachhead line. The 1st Brigade, landing last, was the divisional reserve and the NZ&A Division was to land after the 1st Division was ashore. As we now know, this landing plan fell apart from the outset.
The ship to shore move was to be in various types of ships’ boats, towed by steam launches, the troops being carried to the landing area on battleships, destroyers and merchant ships. To get the 3rd Brigade ashore with the shipping available, battalions would have to land in two waves, thus separating the units into half-battalion groups. This would not have been a problem if the units had landed in the sequence and locations required by the plan. As features became visible on the skyline during the run-in to the beach one of the “tow” commanders on the left or southern flank, fearing that the flotilla was too far south, made course corrections of about 30 degrees to the north, carrying the boats into Anzac Cove and beyond.
 Once ashore commanders found that they were bunched around Ari Burnu Point and on to the beach to the north, placing them well away from most of their objectives. The course changes on the approach had caused some “tows” to cross paths; officers found themselves without their platoons, soldiers were without their leaders. There was confusion on the beach as units tried to reorganise but, as everyone had been extensively briefed that the primary mission was to push on to the Third Ridge, that’s what individuals and small parties did. When the second waves of the battalions arrived, the first halves of their units could not be found and unit cohesion broke down.
The German general, Liman von Sanders, had taken command of all Turkish forces on the peninsula at the end of March. His first action was to reorganise the defence, placing only a screening force forward on the coast and holding the bulk of his formations concentrated in reserve where they could react to situations. The morning of 25 April found only one battalion of the Turkish 27th Regiment, 9th Division covering the coast in the ANZAC sector. The remaining two battalions of the regiment were in reserve at Maidos (today’s Eceabat) while its sister regiments, the 25th and 26th were committed to
Once ashore commanders found that they were bunched around Ari Burnu Point and on to the beach to the north, placing them well away from most of their objectives. The course changes on the approach had caused some “tows” to cross paths; officers found themselves without their platoons, soldiers were without their leaders. There was confusion on the beach as units tried to reorganise but, as everyone had been extensively briefed that the primary mission was to push on to the Third Ridge, that’s what individuals and small parties did. When the second waves of the battalions arrived, the first halves of their units could not be found and unit cohesion broke down.
The German general, Liman von Sanders, had taken command of all Turkish forces on the peninsula at the end of March. His first action was to reorganise the defence, placing only a screening force forward on the coast and holding the bulk of his formations concentrated in reserve where they could react to situations. The morning of 25 April found only one battalion of the Turkish 27th Regiment, 9th Division covering the coast in the ANZAC sector. The remaining two battalions of the regiment were in reserve at Maidos (today’s Eceabat) while its sister regiments, the 25th and 26th were committed to  defence of the southern area. Mustafa Kemal’s 19th Division was the Turkish 5th Army’s reserve, deployed close behind the ANZAC sector. These dispositions allowed the unexpectedly quick Turkish response to the landing. Coupled with the disorganised advance from the beach and delays in landing the balance of the force, particularly artillery, this resulted in the failure of the Australians and New Zealanders to achieve the key objective in an amphibious landing – the need to win the race to build up forces in the landing area.
 By mid-morning elements of the 19th Division had halted the ANZAC advance to the high ground at Baby 700 in the north while the remainder of the 27th Regiment had closed up on and was attacking the southern flank at the 400 Plateau. Those small groups that had made it as far as the Third Ridge were driven back or destroyed and the ANZAC line was finally stabilised on the Second Ridge late on 25 April, still short of the 3rd Brigade objectives. There would be no advance to the Third Ridge and the force was now locked into the tight beachhead where, except for small gains in August, it would remain until the evacuation in December.
Article written by Rod Margetts - who is a battlefield tour guide for Boronia Travel Centre.
Image Top Left: From Ari Burnu point, where you are standing, Anzac Cove lies to your left. This photograph was taken by the correspondent for the Melbourne Age, Philip Schuler, some time on the afternoon of 25 April 1915. It shows clearly the chaos of the beach at that point littered with discarded personal equipment and full of wounded men being looked after by stretcher-bearers with Red Cross armbands. Many of these men have been brought down from the fighting up on the ridges which developed strongly by midday of 25 April as the Turks intensified their counter-attacks trying to drive the Anzacs back to the beaches. No provision had been made for the huge numbers of casualties suffered on the day of the landing as it had been anticipated that the force would quickly have penetrated well inland thus allowing hospitals to be set up ashore in sheltered positions. Between 5.30 pm on 25 April and 3.00 am on the following morning, over 1,700 wounded were evacuated from Anzac Cove. Source: anzacsite.gov.au
Image Centre Right: General Mustafa Kemal. Who was also a revolutionary statesman, writer, and the first President of Turkey. Source: network54.com
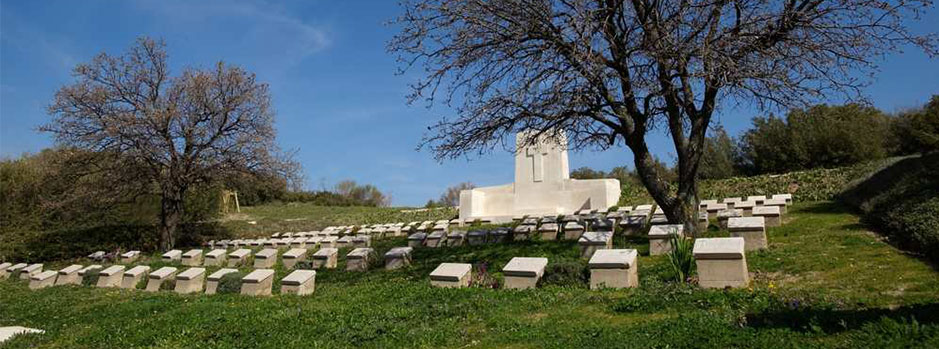
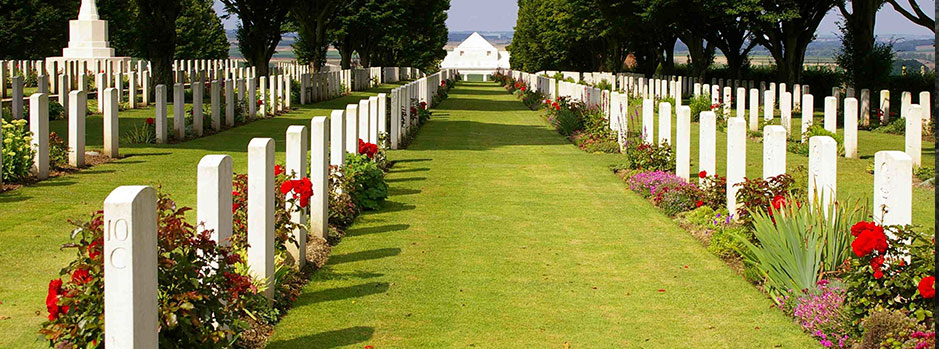
Image Bottom Left: The Turkish 57th Infantry Regiment Cemetery and Memorial. They were virtually destroyed halting the Anzac advance. Source: anzac.govt.nz
By mid-morning elements of the 19th Division had halted the ANZAC advance to the high ground at Baby 700 in the north while the remainder of the 27th Regiment had closed up on and was attacking the southern flank at the 400 Plateau. Those small groups that had made it as far as the Third Ridge were driven back or destroyed and the ANZAC line was finally stabilised on the Second Ridge late on 25 April, still short of the 3rd Brigade objectives. There would be no advance to the Third Ridge and the force was now locked into the tight beachhead where, except for small gains in August, it would remain until the evacuation in December.
Article written by Rod Margetts - who is a battlefield tour guide for Boronia Travel Centre.
Image Top Left: From Ari Burnu point, where you are standing, Anzac Cove lies to your left. This photograph was taken by the correspondent for the Melbourne Age, Philip Schuler, some time on the afternoon of 25 April 1915. It shows clearly the chaos of the beach at that point littered with discarded personal equipment and full of wounded men being looked after by stretcher-bearers with Red Cross armbands. Many of these men have been brought down from the fighting up on the ridges which developed strongly by midday of 25 April as the Turks intensified their counter-attacks trying to drive the Anzacs back to the beaches. No provision had been made for the huge numbers of casualties suffered on the day of the landing as it had been anticipated that the force would quickly have penetrated well inland thus allowing hospitals to be set up ashore in sheltered positions. Between 5.30 pm on 25 April and 3.00 am on the following morning, over 1,700 wounded were evacuated from Anzac Cove. Source: anzacsite.gov.au
Image Centre Right: General Mustafa Kemal. Who was also a revolutionary statesman, writer, and the first President of Turkey. Source: network54.com
Image Bottom Left: The Turkish 57th Infantry Regiment Cemetery and Memorial. They were virtually destroyed halting the Anzac advance. Source: anzac.govt.nz
Once ashore commanders found that they were bunched around Ari Burnu Point and on to the beach to the north, placing them well away from most of their objectives. The course changes on the approach had caused some “tows” to cross paths; officers found themselves without their platoons, soldiers were without their leaders. There was confusion on the beach as units tried to reorganise but, as everyone had been extensively briefed that the primary mission was to push on to the Third Ridge, that’s what individuals and small parties did. When the second waves of the battalions arrived, the first halves of their units could not be found and unit cohesion broke down.
The German general, Liman von Sanders, had taken command of all Turkish forces on the peninsula at the end of March. His first action was to reorganise the defence, placing only a screening force forward on the coast and holding the bulk of his formations concentrated in reserve where they could react to situations. The morning of 25 April found only one battalion of the Turkish 27th Regiment, 9th Division covering the coast in the ANZAC sector. The remaining two battalions of the regiment were in reserve at Maidos (today’s Eceabat) while its sister regiments, the 25th and 26th were committed to defence of the southern area. Mustafa Kemal’s 19th Division was the Turkish 5th Army’s reserve, deployed close behind the ANZAC sector. These dispositions allowed the unexpectedly quick Turkish response to the landing. Coupled with the disorganised advance from the beach and delays in landing the balance of the force, particularly artillery, this resulted in the failure of the Australians and New Zealanders to achieve the key objective in an amphibious landing – the need to win the race to build up forces in the landing area.
By mid-morning elements of the 19th Division had halted the ANZAC advance to the high ground at Baby 700 in the north while the remainder of the 27th Regiment had closed up on and was attacking the southern flank at the 400 Plateau. Those small groups that had made it as far as the Third Ridge were driven back or destroyed and the ANZAC line was finally stabilised on the Second Ridge late on 25 April, still short of the 3rd Brigade objectives. There would be no advance to the Third Ridge and the force was now locked into the tight beachhead where, except for small gains in August, it would remain until the evacuation in December.
Article written by Rod Margetts - who is a battlefield tour guide for Boronia Travel Centre.
Image Top Left: From Ari Burnu point, where you are standing, Anzac Cove lies to your left. This photograph was taken by the correspondent for the Melbourne Age, Philip Schuler, some time on the afternoon of 25 April 1915. It shows clearly the chaos of the beach at that point littered with discarded personal equipment and full of wounded men being looked after by stretcher-bearers with Red Cross armbands. Many of these men have been brought down from the fighting up on the ridges which developed strongly by midday of 25 April as the Turks intensified their counter-attacks trying to drive the Anzacs back to the beaches. No provision had been made for the huge numbers of casualties suffered on the day of the landing as it had been anticipated that the force would quickly have penetrated well inland thus allowing hospitals to be set up ashore in sheltered positions. Between 5.30 pm on 25 April and 3.00 am on the following morning, over 1,700 wounded were evacuated from Anzac Cove. Source: anzacsite.gov.au
Image Centre Right: General Mustafa Kemal. Who was also a revolutionary statesman, writer, and the first President of Turkey. Source: network54.com
Image Bottom Left: The Turkish 57th Infantry Regiment Cemetery and Memorial. They were virtually destroyed halting the Anzac advance. Source: anzac.govt.nz
This entry was posted in Historical Highlights. Bookmark the permalink.